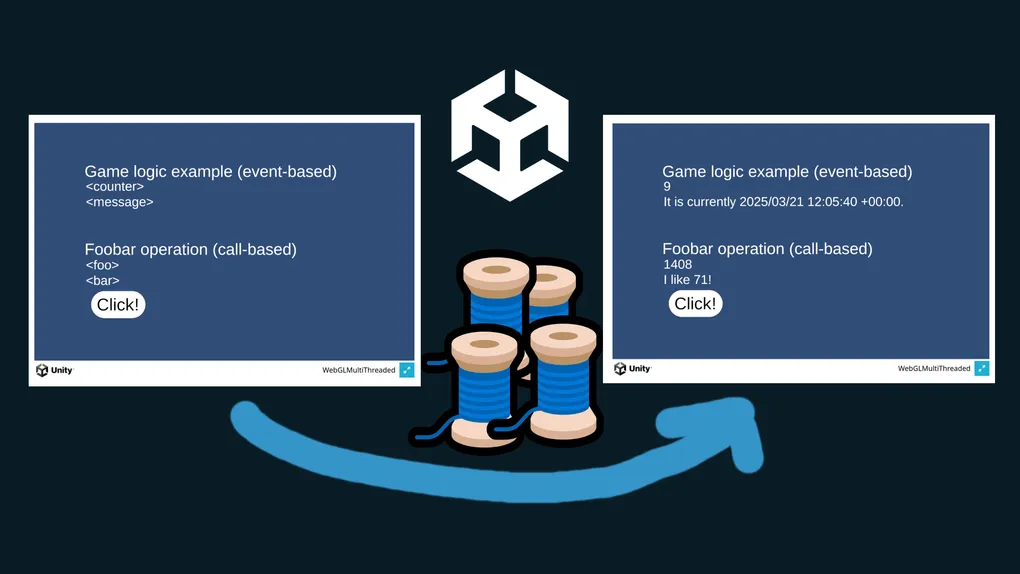
How to add multi-threading to Unity WebGL -- with (mostly) C#! Part 1
Intro
Part 1 of a multi-part series!
- Part 1 🔗: Initial C# -> JS interop implementation
- Part 2 🔗: Cross-platform implementation
- Part 3 🔗: Simplifying JS interop with Comlink
Figured out how to add multi-threading to Unity WebGL projects with C# and without using native threads! Well, sorta…
It uses a mix of .NET WASM and, of course, Web Workers. So, while the it enables writing cross-platform, multi-threaded C# code, the actual multi-threading support for WebGL builds still uses JS. Though somewhat unwieldy, it can definitely be a viable alternative to duplicating logic across, let’s say, JS and C#. Or just do crossplat stuff C++, to be fair!
That being said, .NET WASM has an experimental multi-threading feature that eliminates needing to touch Web Workers
(but still would need a slight Unity <-> JS <-> .NET WASM shim).
I haven’t tried it yet, though, and it’s been delayed over the years (currently set for .NET 10).
Once I have time, next up is implementing a crossplat demo. After that, using Roslyn to help codegen the .NET WASM, .jslib, and Unity-side P/Invoke plumbing that is tedious to do manually!
Motivation
I’m not a game dev. However, since I’m looking for a job, I’m certainly interested in the area. I do have solid Unity experience thanks to VRChat, including releasing many Unity Editor tools (some of which need more than Editor capabilities — like Mechanim and Playables). Still, even with that Unity experience and a ton of C# experience, it’s certainly hard to apply to Unity dev positions, since, again, I’m not a game dev. Not that I haven’t tried 😅
So I need to make a game! The game I have in mind might benefit from multi-threading, and I might want to release a web version.
Plus a standalone version.
And I don’t want to write to versions of the logic: one in JS and one in C#.
And so I went down the rabbit hole and found a neat solution — one that will get better in future .NET versions as well! While I don’t have a game ready, maybe I’ll just apply with this and see what happens 🤔.
Though, note that the cross-platform part hasn’t been started yet, so this post just covers the multithreading with C# part.
Example repo
All the code can be found here: https://github.com/Timiz0r/WebGLMultiThreaded/tree/original 🔗 The readme also contains reasonably complete summary, so head over there for a potentially shorter read.
Problem
JS is single-threaded, so long-running, synchronous operations on the main thread will slow down rendering. Ideally, we’d offload them to another thread.
Built-in options
There is only one: experimental Native C/C++ Multithreading. 🔗
Managed multithreading support does not exist, so multi-threaded C# code will not work at all.
Browser multithreading
The way to do multi-threading in the browser is via Web Workers 🔗. In brief, a worker has its own separate execution context, and communication with the main thread is done via messaging (versus references).
We can certainly use Web Workers in Unity’s WebGL platform, as well, with the help of JavaScript plugins 🔗. This makes implementing logic that should run on a separate thread fully doable by writing it all in JavaScript.
Or, instead of JavaScript, we can use WebAssembly (called by a Web Worker). Of course, WebAssembly typically isn’t written directly. Instead, we use some other language and build our WASM from it.
Cross-platform
If we then want to support games across multiple platforms — let’s say Web and Standalone, we might end up writing the same logic multiple times — once in JavaScript for Web and once in C# for Standalone.
But what about WASM? Can we build the Web build’s WASM from C# and use the same C# for Standalone builds? Quick answer: Yes! That’s what this project is meant to demonstrate.
.NET WASM
First a quick note: this is not Blazor. Instead, Blazor uses this functionality.
Here’s a quick rundown of the features supported 🔗.
There are two different docs for interop. Both are handy, so you’ll probably be referencing both.
- https://learn.microsoft.com/en-us/aspnet/core/client-side/dotnet-interop 🔗 (doesn’t show up in sidebar)
- https://learn.microsoft.com/en-us/aspnet/core/client-side/dotnet-interop/ 🔗 (has extra trailing slash)
Building C#/.NET into WASM is an officially supported feature, so we can turn our C# into WASM, then use that WASM in Unity!
A note on multi-threaded .NET WASM
There is currently an experimental multithreading feature 🔗, having been delayed a long time and scheduled for .NET 10 (for now). Unlike with Unity, this is full C#/.NET — no C++ required. For this example code, I didn’t use the multi-threading feature because it’s not ready yet. However, once completed, we theoretically won’t need to touch Web Workers manually anymore. We’ll just call our multi-threaded C# code (via exported WASM) directly, making the process vastly simpler than what you are about to see.
Event-like semantics
That’s enough copy-pasting from the readme. The readme is a quicker read and goes through the layout of the code — for you to navigate on your own. This post will walk through the process step-by-step and include snippets. First, we’ll start with event-like semantics, since it’s the simpler one to implement!
For this demonstration, we’ll cover the scenario of implementing game logic. Here’s roughly how the different parts will link together:
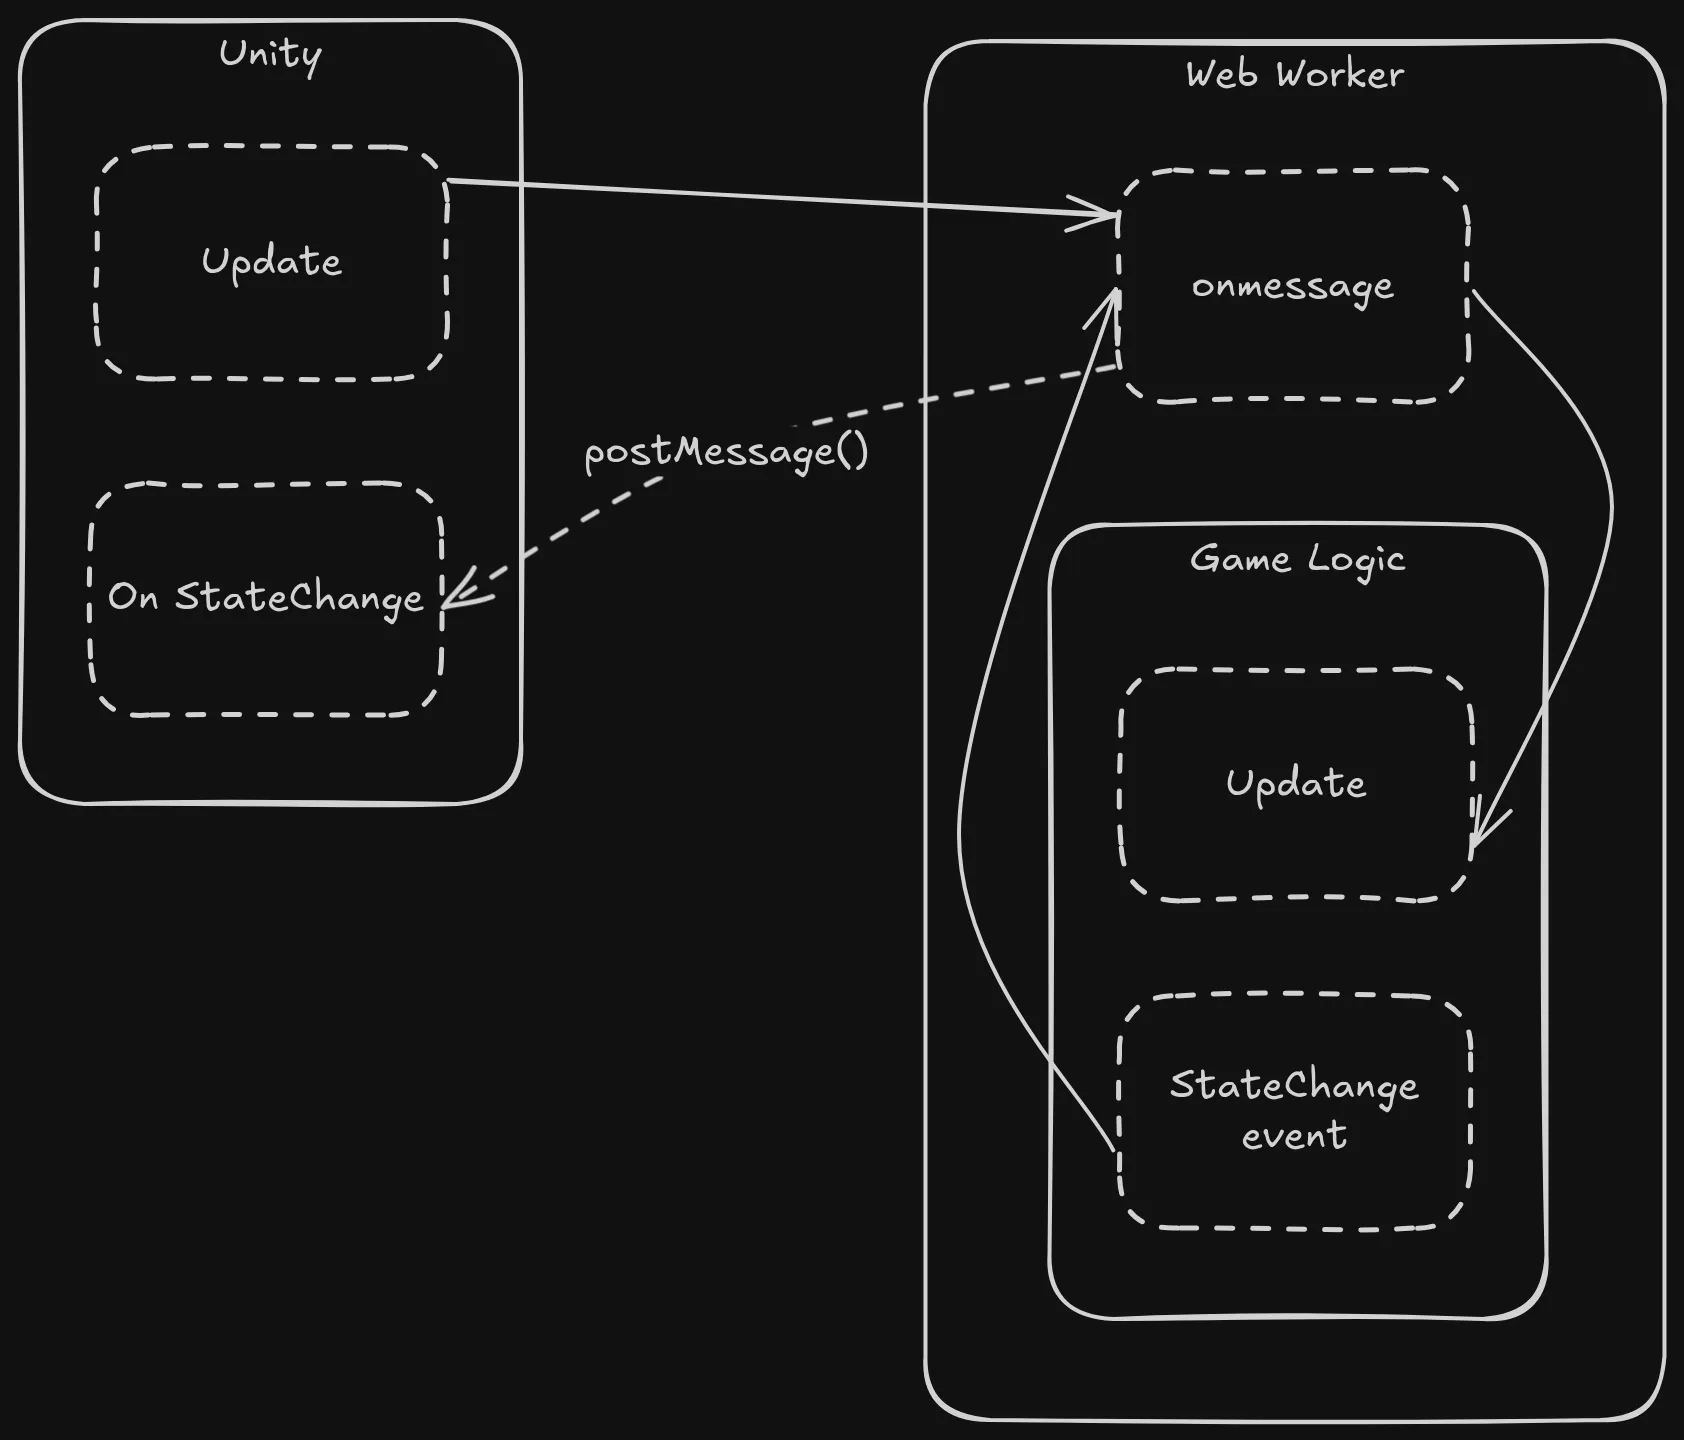
Common game logic code
Somewhere in Assets goes the game logic.
The main thing of note is that the StateChanged event uses object to represent OldValue and NewValue.
Since we’re triggering an event for each “piece” of the state that changes,
the type of the event data needs some commonality between each piece of state.
In other languages, we might have something like type StateChange = ("Counter", value: int) | ("Message", value: string).
C# doesn’t have the “distinguished unions” feature yet, so the next best thing is providing objects and
having the listener cast (or not cast and instead serialize, in our scenario).
Another option is to pass the entire State object at the end of Update if the state changes
(or perhaps even if it doesn’t), rather than trigger an event for each piece of state.
If viable for your scenario, I certainly recommend it!
using System;
using System.Globalization;
using System.Threading;

public class GameLogic
{
    private const float TimePerTick = 1;
    private float nextTime = 0;
    private readonly State state = new();

    public event Action<StateChange> StateChanged;

    public void Update(float time)
    {
        if (time < nextTime) return;
        nextTime = time + TimePerTick;

        //some expensive operation
        Thread.Sleep(500);

        ChangeState(nameof(State.Counter), state.Counter, () => state.Counter += 3);
        ChangeState(nameof(State.Message), state.Message, () => state.Message = $"It is currently {DateTimeOffset.UtcNow}.");
    }

    // generics are used just to provide a bit more safety but arent particularly important
    private void ChangeState<T>(string target, T oldValue, Func<T> setter)
    {
        StateChange eventData = new StateChange(target, oldValue, setter());
        StateChanged?.Invoke(eventData);
    }
}
For the state-related code, we have a few different classes:
- The actual state, of course.
- The non-generic
StateChangeused above. - A convenient way to provide a typed
StateChange<T>. Note that this requires listeners to know how to matchTargetwith a type, but, again, we don’t really have a choice if going with this style of event. UntypedStateChangeis used for JSON (de)serialization with Unity’sJsonUtility. It’s also makes theSystem.Text.Json.JsonSerializerwe’ll use WASM-side a bit easier to use than if we left them asStateChanges.
public class State
{
    public int Counter { get; set; }
    public string Message { get; set; }
}

public class StateChange<T>
{
    private readonly StateChange original;

    public string Target => original.Target;
    public T OldValue => (T)original.OldValue;
    public T NewValue => (T)original.NewValue;

    public StateChange(StateChange stateChange)
    {
        original = stateChange;
    }
}

public class StateChange
{
    public string Target { get; }
    public object OldValue { get; }
    public object NewValue { get; }

    public StateChange(string target, object oldValue, object newValue)
    {
        Target = target;
        OldValue = oldValue;
        NewValue = newValue;
    }

    public StateChange<T> As<T>() where T : IConvertible => new StateChange<T>(this);
}


[Serializable]
public class UntypedStateChange
{
    public string Target;
    public string OldValue;
    public string NewValue;

    public static UntypedStateChange From(StateChange stateChange) => new()
    {
        Target = stateChange.Target,
        OldValue = stateChange.OldValue.ToString(),
        NewValue = stateChange.NewValue.ToString(),
    };

    public StateChange<T> ConvertTo<T>() where T : IConvertible
    {
        return new StateChange(Target, convert(OldValue), convert(NewValue)).As<T>();

        // String's IConvertible implementations implicitly implemented
        T convert(IConvertible value)
            => (T)value.ToType(typeof(T), CultureInfo.InvariantCulture);
    }
}
WASM project
Next, let’s go with the WASM project. It’s the most interesting part of this experiment, and it’ll be needed for the other call-like semantics part of this post anyway.
Prepare the csproj
First, we to install a couple prerequisites, since WASM support doesn’t ship with .NET.
sudo dotnet workload install wasm-tools
sudo dotnet workload install wasm-experimental
Let’s create the project. I chose to create the project within the Assets directory,
and I prefixed it with a dot to ensure Unity can’t see it.
Creating it outside of the Assets directory, in hindsight, is perhaps a better way. In any case…
# ❯ pwd
# /home/tim/dev/unity/WebGLMultiThreaded/Assets
mkdir -p platform_webgl/.wasm/
cd platform_webgl/.wasm/
dotnet new wasmbrowser
Since GameLogic.cs is in a separate place, we need to add it to the project manually.
Also, to make things easier to reason about, let’s make a bunch of dir-related properties.
Oh and as a side-note, the \ path separator is reasonably common to use even when building on Linux for consistency,
but, since MSBuild will handle either just fine, use / as desired!
<Project>
  <PropertyGroup>
    <!-- my directory setup, where this project is in Assets/platform_webgl/.wasm. customize as needed! -->
    <ProjectRoot>$(MSBuildThisFileDirectory.TrimEnd('\').TrimEnd('/'))</ProjectRoot>
    <WebGLPlatformDir>$(ProjectRoot)\..</WebGLPlatformDir>
    <AssetsDir>$(WebGLPlatformDir)\..</AssetsDir>
    <GameLogicDir>$(AssetsDir)\GameLogic</GameLogicDir>
  </PropertyGroup>

  <ItemGroup>
    <Compile Include="$(GameLogicDir)\**\*.cs" />
  </ItemGroup>
</Project>
An important property is PublishDir, which will need to be consistent with where we put our Unity WebGL build.
<PublishDir>$(AssetsDir)\..\build\webgl\interop</PublishDir>In this case, we’ll ultimately put the WebGL build in the build\webgl\ directory.
A couple final steps:
- Clear out the
wwwrootdirectory - Replace the contents of
Program.cswithSystem.Console.WriteLine("Will not run, but the build needs a Main anyway.");
Whenever we change either this project or GameLogic-related code, we’ll need to republish this project.
Publishing is done via dotnet publish.
By default, JIT compilation is used, but performance can be increased — and build times also obnoxiously increased —
with the <RunAOTCompilation>true</RunAOTCompilation> MSBuild property.
Game logic Web Worker
We’ll create a Web Worker script somewhere in wwwroot.
First up is getting the .NET stuff initialized.
// gameLogicInteropWorker.js
import { dotnet } from './_framework/dotnet.js'

let assemblyExports = null;
let startupError = undefined;

try {
    const { setModuleImports, getAssemblyExports, getConfig } = await dotnet.create();

    const config = getConfig();
    assemblyExports = await getAssemblyExports(config.mainAssemblyName);
}
catch (err) {
    startupError = err.message;
}

onmessage = e => {}
The setModuleImports can be used to make JS code available to C#,
and getAssemblyExports can be used to make C# code available to JS.
We’ll be using both, giving a function to C# that it can call when StateChanged is triggered
and getting a function from C# that will be called when the worker gets a message to Update.
Both look something like this:
// ...
try {
    const { setModuleImports, getAssemblyExports, getConfig } = await dotnet.create();

    setModuleImports("GameLogic", {
        StateChanged: data => sendEvent(data)
    });
    // ...
}
// ...

onmessage = e => {
    try {
        if (!assemblyExports) {
            throw new Error(startupError || "worker exports not loaded");
        }

        switch (e.data.command) {
            case "update":
                const time = e.data.time;
                assemblyExports.GameLogicInterop.Update(time);
                break;
            default:
                throw new Error("Unknown command: " + e.data.command);
        }
    }
    catch (err) {
        sendError(err)
    }
};

function sendEvent(data) {
    postMessage({ command: "stateChanged", data });
}
function sendError(err) {
    postMessage({ command: "error", error: err.message });
}
So, Unity-side will send an update command to the worker, which will result in a call to GameLogic.Update.
Whenever GameLogic triggers an event, the StateChanged we define will get called,
which will have the worker send a message back to Unity with the details of the StateChanged event.
Game logic WASM interop
Our worker uses both GameLogicInterop.Update and StateChanged, but we haven’t hooked them up to GameLogic yet.
Let’s do that:
using System.Runtime.InteropServices.JavaScript;
using WebGLMultiThreaded;

internal partial class GameLogicInterop
{
    private static readonly GameLogic Instance = new GameLogic();
    static GameLogicInterop()
    {
        // we need to output json because current wasm source generation doesn't support arbitrary objects
        // see issue for adding a way to easily marshall objects: https://github.com/dotnet/runtime/issues/77784
        Instance.StateChanged += eventData => StateChanged(
            InteropSerialization.Serialize(UntypedStateChange.From(eventData)));
    }

    [JSExport]
    public static void Update(float time)
        => Instance.Update(time);

    [JSImport("StateChanged", "GameLogic")]
    static partial void StateChanged(string stateChangeJson);
}
This GameLogicInterop class is merely a shim between GameLogic and the gameLogicInteropWorker.js Web Worker.
Likewise, the gameLogicInteropWorker.js Web Worker is a shim between Unity and this GameLogicInterop.
In other words: Unity <-> Web Worker <-> WASM <-> GameLogic.
We choose JSON to move data in and out of the worker.
Since serialization of objects is funky, we use UntypedStateChange to convert the values to strings.
See above for more information on all that.
Oh right and the serialization code…
In the case of using AOT compilation, the type information doesn’t make it into the build,
so reflection-based serialization won’t work.
We actually get a nice warning if we try to use plain JsonSerializer.Serialize(obj).
We use the JsonSerializable attribute to generate at build-time a JsonSerializerContext.
We just need to be sure to add a new attribute for each additional type we want to serialize.
using System.Text.Json;
using System.Text.Json.Serialization;
using WebGLMultiThreaded;

[JsonSourceGenerationOptions(IncludeFields = true)]
[JsonSerializable(typeof(FoobarResult))]
[JsonSerializable(typeof(UntypedStateChange))]
internal partial class InteropSerialization : JsonSerializerContext
{
    public static string Serialize<T>(T obj)
        => JsonSerializer.Serialize(obj, typeof(T), InteropSerialization.Default);
}
Unity game logic integration
Almost there!
Components in Unity WebGL, unfortunately, can’t talk directly to JS (aka our Web Worker). So guess what? We need another shim, in addition to a normal Unity component.
Unity game logic component
Though missing some parts, the general structure looks like this:
using System.Runtime.InteropServices;
using TMPro;
using UnityEngine;
using WebGLMultiThreaded;

public class WebGLGameLogic : MonoBehaviour
{
    [DllImport("__Internal")]
    private static extern void GameLogicInterop_Update(float time);

    private void StateChanged(string json)
    {
        UntypedStateChange untypedStateChange = (UntypedStateChange)JsonUtility.FromJson(json, typeof(UntypedStateChange));
        switch (untypedStateChange.Target)
        {
            case "Counter":
            {
                StateChange<int> stateChange = untypedStateChange.ConvertTo<int>();
                var obj = transform.Find("Counter");
                obj.GetComponent<TextMeshPro>().text = stateChange.NewValue.ToString();
                break;
            }

            case "Message":
            {
                StateChange<string> stateChange = untypedStateChange.ConvertTo<string>();
                var obj = transform.Find("Message");
                obj.GetComponent<TextMeshPro>().text = stateChange.NewValue;
                break;
            }

            default:
                Debug.LogError($"Unknown state change: {json}");
                break;
        }
    }

    void Update()
    {
        GameLogicInterop_Update(Time.time);
    }
}
It’s mostly self-explanatory, so I won’t go deep into it. What’s missing, though, is…
- What calls StateChanged?
- Where is GameLogicInterop_Update defined and implemented?
Unity game logic jslib
Answer: in a jslib — Unity’s way of adding JS to a WebGL project!
// GameLogicInterop.jslib
mergeInto(LibraryManager.library, {
// NOTE: unity seems to drop functions that are defined with arrow functions, hence normal `function(){}`
  GameLogicInterop_Initialize: function () {
    if (window.gameLogicInterop) return;

    window.gameLogicInterop = new class {
      constructor () {
        const worker = new Worker('interop/wwwroot/gameLogicInteropWorker.js', { type: "module" });
        worker.onmessage = e => {
          if (e.data.command === "error") {
            console.error(e.data.error);
            return;
          }

          if (e.data.command !== "stateChanged") return;

          this.handleEvent(e.data.data);
        };

        this.worker = worker;
        this.eventListenerGameObjectName = undefined;
      }

      // helpers. turns out we need to define them here too
      sendRequest(request) {
        this.worker.postMessage(request);
      }
      handleEvent(data) {
        if (!this.eventListenerGameObjectName) {
          console.error("GameLogic has no registered event listener.");
          return;
        }

        SendMessage(this.eventListenerGameObjectName, "StateChanged", data);
      }
    }();
  },

  GameLogicInterop_Update: function (time) {
    window.gameLogicInterop.sendRequest({ command: "update", time });
  },

  // unlike the "asynccall" example, we'll actually directly call c# methods
  // in the scenario where there are many events, the alternative would be for this function to take a bunch of callbacks,
  // which we would then store
  // another interesting take involving custom-rolled rpc: https://codewithajay.com/porting-my-unity-game-to-web/
  GameLogicInterop_RegisterEventListener: function (gameObjectName) {
    window.gameLogicInterop.eventListenerGameObjectName = UTF8ToString(gameObjectName);
  }
});
Here, we’ve introduced a couple more functions in addition to GameLogicInterop_Update:
GameLogicInterop_Initialize and GameLogicInterop_RegisterEventListener (these two can be combined if desired).
The initialization function exists because code that’s outside of the mergeInto ultimately gets dropped.
Actually, .jspre files would probably solve part of the problem,
but I haven’t experimented with them because I’d like to keep everything encapsulated in the same jslib file.
In any case, this is why we’ve added an object to window:
so the other functions we add can access our helper class to interact with the Web Worker.
The SendMessage we use in order for JS to communicate back to C# is a Unity special that takes a GameObject
name loaded into the scene and the name of a method found some component attached to that GameObject.
It can also be provided with a third parameter — a string or a numeric value.
The gameObject we give to GameLogicInterop_RegisterEventListener is meant to be a string.
However, it comes in as an integer because Unity and emscripten (the compiler building Unity’s il2cpp to WASM) don’t
convert its UTF8 strings to a JavaScript string
(side-note: since .NET strings are UTF16, they surely get converted to UTF8 at some point).
That’s where emscripten’s UTF8ToString comes in!
Let’s hook Unity up with GameLogicInterop_Initialize and GameLogicInterop_RegisterEventListener, as well.
public class WebGLGameLogic : MonoBehaviour
{
    [DllImport("__Internal")]
    private static extern void GameLogicInterop_Initialize();

    [DllImport("__Internal")]
    private static extern void GameLogicInterop_RegisterEventListener(string gameObjectName);

    // ...

    void Start()
    {
        GameLogicInterop_Initialize();
        // these are separate in case GameLogicInterop_RegisterEventListener is expected to be re-callable
        // of course, they can be combined if this will not happen.
        GameLogicInterop_RegisterEventListener(name);
    }

}
Hook up scene with game logic component
Given the StateUpdated event handler above, the scene would look something like this:
- GameLogic object
- WebGLGameLogic component
- Counter object
- TextMesh Pro component
- Message object
- TextMesh Pro component
Otherwise, unless I missed something, we’re done!
If we publish the WASM project and Build And Run the Web build of the Unity project,
the Counter and Message objects should get updated every second (after the Web Worker’s [.NET] initialization is done).
Call-like semantics
Instead of triggering events, maybe we want to call something and get back a result when complete. This is a bit more complicated, since we have to correlate response messages back to the original call, but it’s entirely doable! There’s a lot in common with the event-like approach, so I’ll gloss over a lot of details. Be sure to give it (another) read if something isn’t clear.
For this demonstration, let’s say we have some Foobar operation that takes a while to run.
Here’s roughly how the different parts will link together:
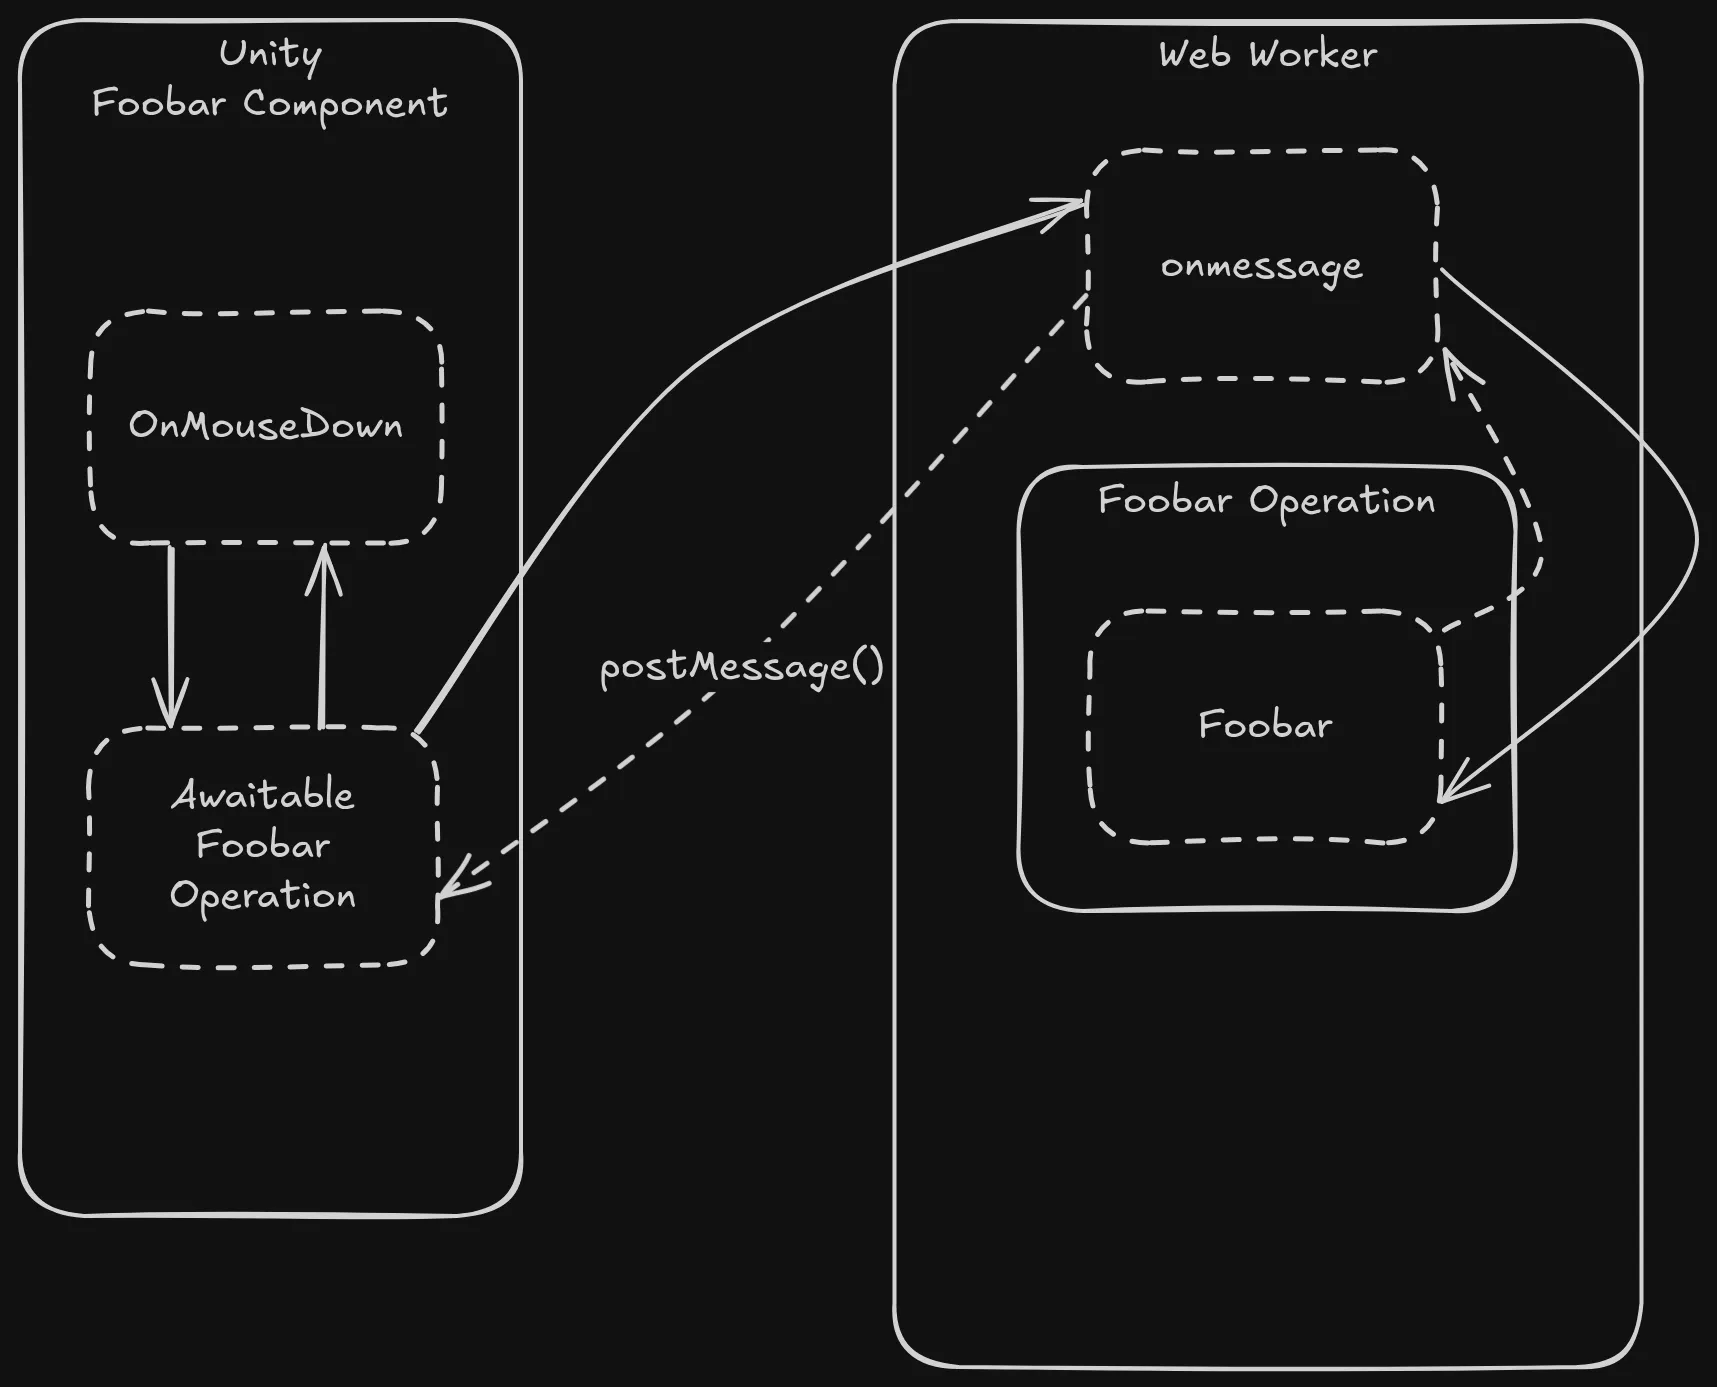
Common Foobar operation code
Nice and simple!
using System.Threading;

namespace WebGLMultiThreaded
{
    public static class OperationRunner
    {
        public static FoobarResult Foobar(int num)
        {
            //some expensive operation
            Thread.Sleep(500);

            return new()
            {
                Foo = num + 1337,
                Bar = $"I like {num}!"
            };
        }
    }

    // using fields for Unity JsonUtility reasons
    public class FoobarResult
    {
        public int Foo;
        public string Bar;
    }
}
Also, be sure to update the WASM project to include these files, as well.
  <PropertyGroup>
    <OperationsDir>$(AssetsDir)\Operations</OperationsDir>
  </PropertyGroup>
  <ItemGroup>
    <Compile Include="$(OperationsDir)\**\*.cs" />
  </ItemGroup>
Foobar operation Web Worker
This will look mostly but not entirely similar to the event-like game logic approach.
import { dotnet } from './_framework/dotnet.js'

onmessage = e => {
    postMessage({ requestId: e.data.requestId, command: "initializing" });
};

let assemblyExports = null;
let startupError = undefined;

try {
    const { getAssemblyExports, getConfig } = await dotnet.create();
    const config = getConfig();
    assemblyExports = await getAssemblyExports(config.mainAssemblyName);
}
catch (err) {
    startupError = err.message;
}

onmessage = e => {
    const baseResponse = { requestId: e.data.requestId };
    function sendResponse(result) {
        postMessage({ ...baseResponse, command: "response", result });
    }
    function sendError(err) {
        postMessage({ ...baseResponse, command: "error", error: err.message });
    }

    try {
        if (!assemblyExports) {
            throw new Error(startupError || "worker exports not loaded");
        }

        switch (e.data.command) {
            case "Foobar":
                const num = e.data.num;
                const result = assemblyExports.OperationRunnerInterop.Foobar(num);
                return sendResponse(result)
            default:
                throw new Error("Unknown command: " + e.data.command);
        }
    }
    catch (err) {
        sendError(err)
    }
};
The most important difference is that we expect a requestId when we receive a message, and,
when we respond with the result of OperationRunnerInterop.Foobar, we send the same requestId back.
This is how we’ll correlate messages later on.
Furthermore, we two onmessages. Our worker contains some async parts, so its full initialization can take a bit of time.
However, the Worker constructor finishes before this
(wouldn’t want to block the main thread on worker initialization, after all),
and it’s possible to send messages to a worker before its onmessage is set.
In such a case, messages are dropped, as opposed to being queued.
For most workers, this isn’t a problem.
However, since the code referencing our worker will store context related to the request id,
dropping requests means leaving those requests orphaned.
To solve this, we set an initial onmessage before we do .NET initialization,
immediately responding with an “initializing” message.
Once .NET initialization is done, we set a new onmessage that handles requests properly.
Finally, note that our long-running Foobar operation is synchronous.
This causes the worker to function as a queue, waiting for one operation to finish before performing another one.
It’s also possible to make the original OperationRunner.Foobar async, as well as onmessage,
and this would allow for long-running operations to yield back time to the worker and start other long-running operations.
Whether or not this is desirable is scenario-dependent, but it’s worth mentioning!
I chose to keep it simple for this demonstration.
(And so I haven’t tried it in practice)
Foobar operation WASM
Nothing in particular to explain.
using System.Runtime.InteropServices.JavaScript;
using WebGLMultiThreaded;

internal partial class OperationRunnerInterop
{
    [JSExport]
    public static string Foobar(int num) => InteropSerialization.Serialize(OperationRunner.Foobar(num));
}
And serialization-side, be sure to add the [JsonSerializable(typeof(FoobarResult))] attribute.
Unity Foobar operation integration
This is where things get a little freaky.
Unity Foobar operation jslib
Rather than pasting most of the code up-front, let’s go fragment by fragment!
mergeInto(LibraryManager.library, {
  OperationRunnerInterop_Initialize: function () {
    if (window.operationRunnerInterop) return;

    window.operationRunnerInterop = new class {
      constructor() {
        const worker = new Worker('interop/wwwroot/operationRunnerInteropWorker.js', { type: "module" });
        worker.onmessage = e => {}

        this.worker = worker;
        this.pendingRequests = {};
        this.nextRequestId = 0;
      }

      // helpers. turns out we need to define them here too
      sendRequest(request, success, failure, initializing) {
        const requestId = this.nextRequestId++;
        this.pendingRequests[requestId] = { success, failure, initializing };
        this.worker.postMessage({ ...request, requestId });
        return requestId;
      }

      sendResponse(callback, requestId, response) {}
    }();
  },

  OperationRunnerInterop_Foobar: function (num, success, failure, initializing) {
    return window.operationRunnerInterop.sendRequest({ command: "Foobar", num }, success, failure, initializing);
  },
});
The general structure is pretty similar to the event-like one, at least initially.
It’s our sendRequest that comes up with the requests ids we’ll be correlating.
While the actual Foobar operation simply takes an int,
our OperationRunnerInterop_Foobar also takes some callbacks.
When we invoke this operation, the callbacks gets stored in the pendingRequests objects, mapping the request id to them.
As one would imagine, we’ll call one of these callbacks when the response message comes back in,
after the worker has finished running the Foobar operation.
Let’s implement the jslib’s onmessage:
        worker.onmessage = e => {
          const command = e.data.command;
          const requestId = e.data.requestId;

          const callbacks = window.operationRunnerInterop.pendingRequests[requestId];
          delete window.operationRunnerInterop.pendingRequests[requestId];
          if (callbacks == null) {
            console.error("Operation response has no corresponding request.");
            return;
          }

          const success = callbacks.success;
          const failure = callbacks.failure;
          const initializing = callbacks.initializing;

          if (command === "initializing") {
            this.sendResponse(initializing, requestId, null);
            return;
          }

          if (command === "error") {
            this.sendResponse(failure, requestId, e.data.error);
            return;
          }

          if (command === "response") {
            this.sendResponse(success, requestId, e.data.result);
            return;
          }

          console.error("Unknown command: ", command);
        };
Finally, the sendResponse implementation.
First, we need to convert the JavaScript string to UTF8, for use in our C# code.
Additionally, we need to go about invoking the callback.
Remember how the C# string we pass to JavaScript is actually a number,
and we have to convert it to a JavaScript string with UTF8ToString?
Similarly, our callbacks are numbers and require special handling, describing how to invoke the callback.
v— the first character — means the callback returns nothing (void)- The first
irefers to the integerrequestId - The second
irefers to the integer buffer (again, actually a number JS-side)
The invocation is done via emscripten’s makeDynCall… 🤔 thingy,
which generates the correct JavaScript used to invoke the callback.
      sendResponse(callback, requestId, response) {
        const len = lengthBytesUTF8(response) + 1;
        const buffer = _malloc(len);
        stringToUTF8(response, buffer, len);
        {{{ makeDynCall('vii', 'callback') }}} (requestId, buffer);
        // NOTE: it's not clear if there's a risk of use-after-free here, if the callback stores the data (closure, etc.)
        // probably not a problem *if* Unity converts it to UTF16 (and doesn't otherwise use the UTF8 version).
        // but, somewhere in the .NET->il2cpp->wasm pipeline, perhaps UTF16 no longer gets used.
        _free(buffer);
      }
Unity Foobar operation component
This code is actually very self-explanatory,
because we’ve put all the request correlation and serialization code into a OperationRequestBuilder class.
using System;
using System.Runtime.InteropServices;
using TMPro;
using UnityEngine;
using WebGLMultiThreaded;

public class FoobarComponent : MonoBehaviour
{
    private static readonly System.Random rng = new();

    // if an operation is used across multiple components, it's probably desireable to encapsulate the operation
    // in another (static) class. it's currently only used in this component, so we've kept it simple.
    [DllImport("__Internal")]
    private static extern void OperationRunnerInterop_Initialize();

    [DllImport("__Internal")]
    private static extern int OperationRunnerInterop_Foobar(
        int num, Action<int, string> success, Action<int, string> failure, Action<int> initializing);

    private static OperationRequestBuilder<FoobarResult, string> foobarOperation = OperationRequestBuilder.Create(
        success: stateJson => (FoobarResult)JsonUtility.FromJson(stateJson, typeof(FoobarResult)),
        failure: error => error
    );

    void Start()
    {
        // incidentally, this function's implementation ensures multiple initialization isn't possible
        OperationRunnerInterop_Initialize();
    }

    async Awaitable OnMouseDown()
    {
        OperationResponse<FoobarResult, string> response = await foobarOperation.Launch(
            (success, failure, initializing) => OperationRunnerInterop_Foobar(rng.Next(100), success: success, failure: failure, initializing: initializing));

        if (!response.IsSuccess)
        {
            Debug.LogError($"Failed to run operation: {response.Error}");
            return;
        }
        FoobarResult result = response.Result;

        Transform foobar = transform.parent;

        if (foobar?.Find("Foo") is Transform foo)
        {
            foo.GetComponent<TextMeshPro>().text = result.Foo.ToString();
        }

        if (foobar?.Find("Bar") is Transform bar)
        {
            bar.GetComponent<TextMeshPro>().text = result.Bar;
        }
    }
}
Unity Awaitable request helper
While I’ve tried to not overdesign this demonstration, I couldn’t help myself here!
Similar to the jslib code, we also need to do request id correlation if we want to combine the request and response
of the Foobar operation into a single Awaitable.
Furthermore, we’ll want to deserialize the responses of the request based on the operation being performed
(only Foobar exists in this demonstration, though).
We can combine all of this into a simple interface.
First, let’s fill in the main structure of the class.
This class is meant to handle and deserialize a specific operation.
Foobar gets an instance. Future operations also get an instance.
As such, in addition to a dictionary to track request ids, we’ll take in a couple deserialization callbacks.
public class OperationRequestBuilder<TResult, TError>
{
    // NOTE: since (afaik) Awaitables are meant to really be invoked only off main thread, not handling thread safety
    private static Dictionary<int, RequestContext> requests = new();

    private readonly Func<string, TResult> successBuilder;
    private readonly Func<string, TError> failureBuilder;

    public OperationRequestBuilder(Func<string, TResult> successBuilder, Func<string, TError> failureBuilder)
    {
        this.successBuilder = successBuilder;
        this.failureBuilder = failureBuilder;
    }

    private record RequestContext(
        AwaitableCompletionSource<OperationResponse<TResult, TError>> CompletionSource,
        OperationRequestBuilder<TResult, TError> Builder);
}
This class will also need to contain the callbacks that we pass to the method that begins the request
(OperationRunnerInterop_Foobar in this demonstration).
    [MonoPInvokeCallback(typeof(Action<int, string>))]
    private static void Success(int requestId, string result)
    {
        if (!RetrieveRequestContext(requestId, out RequestContext requestContext)) return;

        requestContext.CompletionSource.SetResult(
            new(
                IsSuccess: true,
                Result: requestContext.Builder.successBuilder(result),
                Error: default));
    }

    // quick note: c# 10 gets lambda attributes! unity on c# 9 though.
    // though, since pinvoke, afaik, requires static methods, perhaps we couldn't use lambdas anyway.
    // PS: do lambdas that ultimately don't capture anything get generated as static methods?
    // also, static lambda proposal exists
    [MonoPInvokeCallback(typeof(Action<int, string>))]
    private static void Failure(int requestId, string error)
    {
        if (!RetrieveRequestContext(requestId, out RequestContext requestContext)) return;

        requestContext.CompletionSource.SetResult(
            new(
                IsSuccess: false,
                Result: default,
                Error: requestContext.Builder.failureBuilder(error)));
    }

    [MonoPInvokeCallback(typeof(Action<int>))]
    private static void Initializing(int requestId)
    {
        if (!RetrieveRequestContext(requestId, out RequestContext requestContext)) return;

        // NOTE: not ideal for same reason as "duplicate request id" case described further up
        // it's an area that needs further design
        requestContext.CompletionSource.SetResult(
            new(
                IsSuccess: false,
                Result: default,
                Error: default));
    }

    private static bool RetrieveRequestContext(int requestId, out RequestContext requestContext)
    {
        if (!requests.TryGetValue(requestId, out requestContext))
        {
            Debug.LogError($"Unknown request id: {requestId}");
            return false;
        }
        requests.Remove(requestId);
        return true;
    }
We can finally fill out our Launch implementation.
Aside from the duplicate request id check, pretty much all we do is map a request id to a AwaitableCompletionSource.
As seen in the above code, one of the three callbacks will be invoked,
completing the AwaitableCompletionSource with the appropriate result.
    public Awaitable<OperationResponse<TResult, TError>> Launch(
        Func<Action<int, string>, Action<int, string>, Action<int>, int> requestLauncher)
    {
        AwaitableCompletionSource<OperationResponse<TResult, TError>> completionSource = new();

        int requestId = requestLauncher(Success, Failure, Initializing);
        if (requests.ContainsKey(requestId))
        {
            Debug.LogError($"Duplicate request id: {requestId}");
            completionSource.SetResult(new(IsSuccess: false, Result: default, Error: default));
            return completionSource.Awaitable;
        }

        requests.Add(requestId, new(completionSource, this));
        return completionSource.Awaitable;
    }
Just a couple types left! First, our result type:
public record OperationResponse<TResult, TError>(
    bool IsSuccess,
    TResult Result,
    TError Error
);
Finally, a helper to easily create instances of OperationRequestBuilder,
just so we don’t have to manually provide generic type parameters:
public static class OperationRequestBuilder
{
    // instead of a two-step Create->Launch, we could just do it all in a Launch
    // opting for this to keep the callsite of Launch cleaner
    public static OperationRequestBuilder<TResult, TError> Create<TResult, TError>(
        Func<string, TResult> success, Func<string, TError> failure) => new(success, failure);
}
Hook up scene with Foobar component
Referencing our component, our scene will look something like this:
- Foobar object
- Button object
- Foobar component
- Collider component (for clicking reasons)
- Foo object
- TextMesh Pro component
- Bar object
- TextMesh Pro component
- Button object
Otherwise, unless I missed something, we’re done!
If we publish the WASM project and Build And Run the Web build of the Unity project,
clicking our button should update our TextMesh Pros (after the Web Worker’s [.NET] initialization is done).
Afterword
There we have it: two different ways to get multi-threading into a Unity WebGL project, with the main implementation in C#. Of course, it requires a lot of plumbing to get it right. Do I recommend it? In the immortal words of T90Official: It depends
- If writing a cross-platform game entirely in C# with multi-threading capabilities in mind, then yes!
- If you’re willing to use .NET WASM multi-threading, either experimental or finished version, then yes!
This still requires some interop work, but Unity-side
jslibs should be able to interact directly with .NET WASM, which should drastically reducing the amount of extra work. - If writing a cross-platform game with parts in C++ and multi-threading capability in mind, then just go with native threads.
- If you don’t need multi-threading, then obviously no 😂.
Pain points
How painful it is to implement does largely depend on how much effort one puts into design. Still…
Play mode
As-is, play mode won’t work, since play mode doesn’t load JavaScript plugins
(since the Web build isn’t run in play mode, no matter which platform is selected).
Making the game cross-platform is the way to solve it,
but that still doesn’t help with debugging and testing the WebGL build.
The only way to do so is to Build And Run, which takes a rather long time if any code is changed.
Rebuilds with just scene changes are quick enough, though.
Also, non-AOT WASM builds are very quick.
Debugging
Since play mode isn’t a thing, so neither is debugging (in the modern sense).
Unity-side, debugging requires lots of console logging and rebuilds that take minutes even for small projects. This is mainly because we can’t run or debug jslib stuff in play mode, and, to be fair, this is regardless of wanting to satisfy multi-threading requirements/desires. Finally, once all the plumbing is hooked up, plus perhaps a bit more design magic to make things easier to extend, the pain should go away.
C#/WASM-side, there is again no real debugging, requiring console logging. However, non-AOT rebuilds only take a handful of seconds and don’t require Unity rebuilds, so iteration is pretty quick. This is handy, since, for the game logic example, most churn should be there as compared to Unity.
Plumbing
The end goal is Game logic/long-running operations <-> Unity
(the WASM interop parts are technically shims, but they’re luckily very light),
but, in between these two, we have WASM <-> Web Worker <-> jslib.
The WASM interop part is pretty light, so it’s not much of a problem.
The real complexity is in Web Worker <-> jslib, where all the message passing logic needs to be done.
And there’s the matter of serialization.
Once again, with .NET WASM multi-threading, the Web Worker part should go away, removing the vast majority of the complexity, leaving fairly simple WASM and jslib shims. The serialization part would remain, though.
As implemented in the event-like demonstration, if using a single, weakly-typed event, adding new events luckily doesn’t require changing any of these shims. If going with separate events, they all need additional changes, though.
As implemented in the call-like demonstration, adding new operations requires changes in all the other shims.
In both cases, the changes aren’t complicated, but it’s obnoxious and error-prone to have so many. Combined with difficulty in testing/debugging, potential pain!
Recommend codegen for large projects
Personally, if I had a large project on hand with lots of operations or events, I would implement codegen for all of these shims, using Roslyn to help perform the analysis. All the error-proneness and tedium go away this way! While it would take a bit of work to get right, maintaining a bunch of shims is surely a lot more work at some point.
Credits and shoutouts
The .NET WASM stuff is largely based off this repo: https://github.com/ilonatommy/reactWithDotnetOnWebWorker/tree/master 🔗
Someone did something similar Web Workers, though the goal wasn’t cross-platform but was instead running user-provided JS code: https://codewithajay.com/porting-my-unity-game-to-web/ 🔗 The interesting part here is that they implemented their own one-size-fits-all RPC solution. For this demonstration project, the Web Workers and jslib files need to be extended when new events/operations are added. For their project, this necessity goes away. Of course, I’ve only done it that way for simplicity, but their solution is quite nice!
Once again, with .NET WASM multi-threading, the need to even implement one’s own RPC would also go away.
To do
The example wouldn’t really be complete without demonstrating some pattern for cross-platform support, so that will be the next major thing to add.
Also, I’d like to use Roslyn to help codegen all the jslib/WASM/Web Worker stuff/Unity-side P/Invoke code. I’ve used Roslyn in Unity in the past for my localization system, so it shouldn’t be overly hard to get started. Of course, getting it working is another matter!
Other handy references
- Type mappings from .NET to WASM: https://learn.microsoft.com/en-us/aspnet/core/client-side/dotnet-interop/?view=aspnetcore-9.0#type-mappings 🔗
- emscripten function signature stuff (the
viiiin{{{ makeDynCall('viii', 'callback') }}} (requestId, buffer);): https://emscripten.org/docs/porting/connecting_cpp_and_javascript/Interacting-with-code.html#function-signatures 🔗